
To connect AWeber to WordPress, first install the AWeber plugin on your WordPress site. Then, authenticate your account and follow the on-screen instructions to integrate.
Connecting AWeber to WordPress enhances your email marketing efforts. AWeber provides powerful tools for managing subscribers and automating campaigns. By integrating AWeber, you can easily capture leads directly from your website. This integration streamlines your marketing processes, allowing you to focus on content creation.
With just a few steps, your WordPress site can effectively gather email addresses and engage visitors. Understanding how to set up this connection can lead to improved communication with your audience. Follow the steps outlined here to maximize your email marketing strategy and drive better results for your business.

Credit: m.youtube.com
Introduction To Aweber And WordPress Integration
Integrating Aweber with WordPress is a powerful move. This connection enhances your email marketing efforts. Aweber helps build your email list directly from your WordPress site. It simplifies communication with your audience. Let’s dive into why this integration matters.
The Importance Of Email Marketing
Email marketing is crucial for online success. Here are some key reasons:
- Direct communication with your audience
- Higher conversion rates compared to social media
- Ability to nurture leads
- Control over your content and branding
Statistics show that email marketing can yield a return on investment of up to 4400%. This makes it a valuable tool for businesses of all sizes.
Why Choose Aweber For Your WordPress Site
Aweber stands out for several reasons:
| Feature | Description |
|---|---|
| User-Friendly | Easy to set up and use, even for beginners. |
| Automation | Automate email campaigns to save time. |
| Templates | A variety of templates for effective email design. |
| Analytics | Track performance with detailed analytics. |
Choosing Aweber allows you to leverage these features effectively. It supports the growth of your WordPress site.
Prerequisites For Integration
Connecting Aweber to your WordPress site requires some setup. Follow these steps to ensure a smooth integration. Prepare both your Aweber account and your WordPress site.
Aweber Account Setup
First, you need an active Aweber account. Here’s how to set it up:
- Visit the Aweber website.
- Click on “Sign Up” to create an account.
- Fill in your details like name and email.
- Choose a plan that suits your needs.
- Verify your email address.
After setting up:
- Log in to your Aweber account.
- Create an email list for your subscribers.
- Get your API key from the account settings.
Preparing Your WordPress Site
Next, prepare your WordPress site for the integration:
- Ensure you have administrator access to your site.
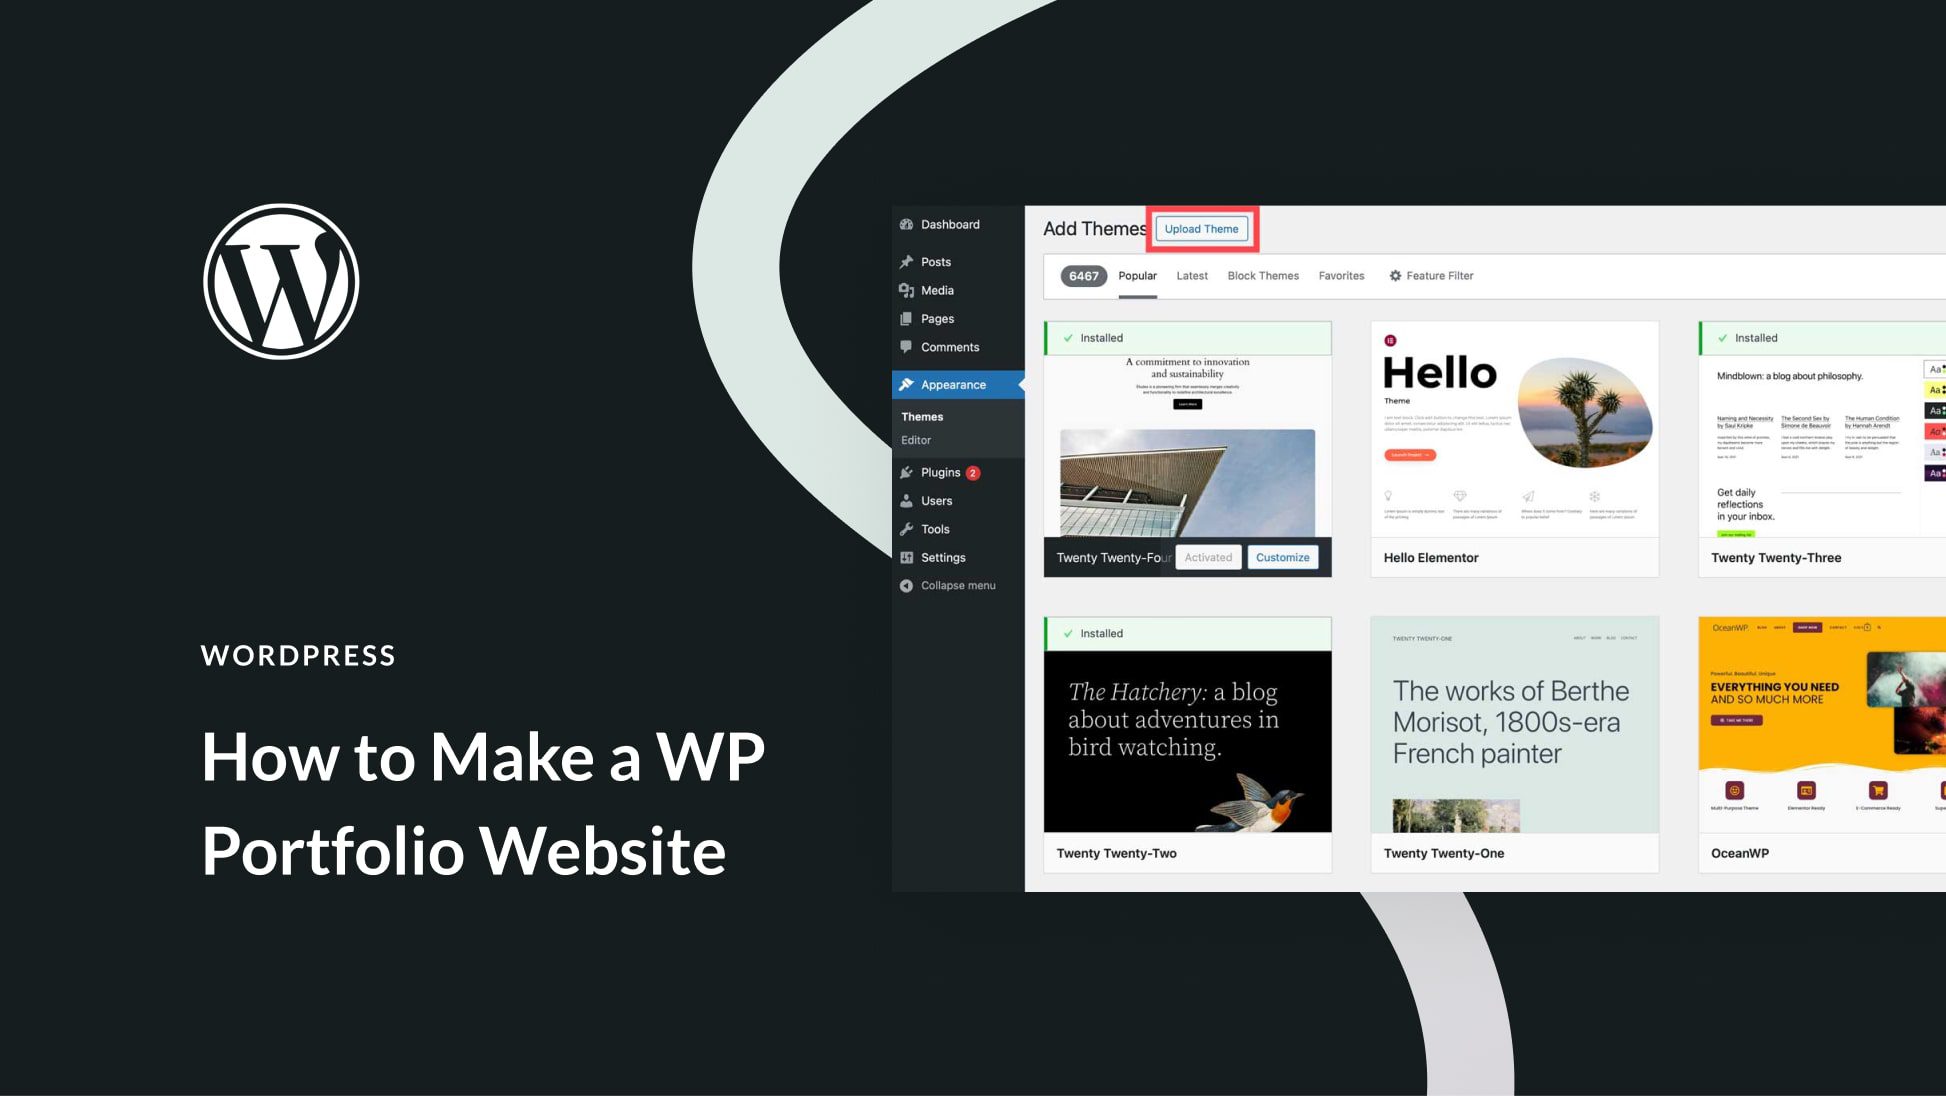
- Install the Aweber plugin from the WordPress dashboard.
- Activate the plugin after installation.
- Go to the plugin settings to connect your Aweber account.
Check the following points:
| Point | Status |
|---|---|
| Plugin Installed | ✔️ |
| Plugin Activated | ✔️ |
| Aweber Account Ready | ✔️ |
With these preparations, you are ready to connect Aweber to your WordPress site. Follow the next steps to complete the integration.
Choosing The Right Aweber Plugin For WordPress
Finding the right Aweber plugin is crucial for your WordPress site. The right plugin helps manage email campaigns easily. It also integrates smoothly with your existing system. Two main options exist: the official Aweber plugin and various third-party plugins.
Official Aweber WordPress Plugin
The official Aweber plugin is user-friendly. It provides direct integration with Aweber. Here are some of its key features:
- Easy Setup: Simple installation and configuration.
- Form Creation: Create sign-up forms quickly.
- Customization: Customize forms to match your website design.
- Analytics: Track subscriber activity directly.
This plugin is perfect for beginners. It offers reliable support and regular updates. Follow these steps to install it:
- Go to your WordPress dashboard.
- Click on Plugins > Add New.
- Search for “Aweber.”
- Click Install Now and then Activate.
Third-party Aweber Plugins
Many third-party plugins also connect Aweber to WordPress. They offer unique features and flexibility. Consider these popular options:
| Plugin Name | Key Features |
|---|---|
| WPForms | Drag-and-drop form builder, templates available. |
| MailOptin | Leads generation tools, exit-intent popups. |
| OptinMonster | Advanced targeting, A/B testing features. |
Third-party plugins often offer more features. They can help in lead generation and conversion. Choose a plugin that fits your needs. Always check reviews and user feedback.
Step-by-step Guide To Connecting Aweber To WordPress
Connecting Aweber to WordPress enhances your email marketing efforts. Follow these simple steps to integrate Aweber seamlessly.
Installing The Aweber Plugin
To start, you need to install the Aweber plugin on your WordPress site. Follow these steps:
- Log in to your WordPress dashboard.
- Go to Plugins > Add New.
- Search for Aweber in the search bar.
- Find the Aweber for WordPress plugin.
- Click Install Now.
- After installation, click Activate.
Your Aweber plugin is now active on your WordPress site.
Configuring Aweber Api Settings
Next, configure the Aweber API settings. This connects your Aweber account to WordPress.
- Go to Aweber in your WordPress dashboard.
- Click on Settings.
- Log in to your Aweber account.
- Authorize WordPress to connect to Aweber.
After logging in, follow these instructions:
- Copy your API Key from Aweber.
- Paste the API Key in the WordPress settings.
- Click Save Changes.
Your Aweber account is now connected to WordPress.
Here’s a quick reference table for settings:
| Setting | Action |
|---|---|
| Install Aweber Plugin | Follow the installation steps |
| Log in to Aweber | Enter credentials in settings |
| API Key | Copy and paste in settings |
With these steps, you can successfully connect Aweber to your WordPress site. Start building your email list today!
Creating And Customizing Aweber Forms
Creating and customizing Aweber forms is essential for effective email marketing. These forms help you collect subscriber information. You can design them to match your website’s style. Let’s explore how to create and customize your forms.
Designing Your First Email Form
Start by logging into your Aweber account. Follow these steps to design your first email form:
- Navigate to the “Sign Up Forms” tab.
- Click on “Create a Sign Up Form.”
- Choose a template that fits your brand.
- Customize fields such as name and email.
- Add images or text to enhance appeal.
Utilize the form builder’s drag-and-drop feature. This makes it easy to arrange elements. Save your progress frequently to avoid losing changes.
Preview your form. Check how it looks on different devices. Adjust colors and fonts to ensure it matches your website.
Embedding Aweber Forms In WordPress
Embedding your Aweber form into WordPress is simple. Follow these steps:
- In Aweber, go to “Publish” after saving your form.
- Choose “WordPress” from the embed options.
- Copy the provided HTML code.
- Log into your WordPress dashboard.
- Navigate to the page or post where you want the form.
- Switch to the HTML editor.
- Paste the copied code into your content area.
- Publish or update the page.
Your Aweber form will now appear on your WordPress site. Test it to ensure it works. This process helps grow your email list effectively.
Advanced Aweber Features For WordPress Users
Aweber offers powerful tools for WordPress users. These features enhance email marketing efforts. They help you connect better with your audience.
Segmentation And Tags
Segmentation and tags are key for targeted marketing. They help you group subscribers based on interests. This makes your emails more relevant.
- Segmentation: Divide your audience into smaller groups.
- Tags: Assign specific labels to subscribers.
Use these features to send personalized content. Here’s how to use segmentation and tags:
- Create segments based on user behavior.
- Tag subscribers after they engage with your content.
- Send tailored emails to each segment.
With segmentation and tags, improve your open rates. This leads to better engagement with your audience.
Automated Email Campaigns
Automated email campaigns save time and effort. They allow you to send emails without manual work. This ensures your audience receives timely updates.
Here are some benefits of automated campaigns:
- Consistency: Maintain regular communication.
- Efficiency: Reach many subscribers at once.
- Customization: Personalize messages for different segments.
To set up automated campaigns:
- Choose an automation trigger, like a signup.
- Create a series of emails for the campaign.
- Monitor performance and adjust as needed.
Automated campaigns help nurture leads. They keep your audience engaged and informed.
Troubleshooting Common Integration Issues
Integrating Aweber with WordPress can enhance your email marketing. Sometimes, issues arise during this process. Understanding these common problems can help you fix them quickly.
Api Connection Errors
API connection errors can prevent Aweber from working with WordPress. Here are some common issues:
- Incorrect API Key: Ensure you entered the correct API key.
- Firewall Restrictions: Check if your hosting provider blocks API requests.
- Plugin Conflicts: Disable other plugins to see if they cause issues.
Follow these steps to resolve API connection errors:
- Log into your Aweber account.
- Navigate to the API settings.
- Copy the API key.
- Paste the API key into the WordPress Aweber plugin settings.
- Test the connection.
Check your settings again. Most issues can be resolved this way.
Form Display Problems
Sometimes, Aweber forms do not display correctly on your WordPress site. Here are a few reasons:
- Theme Compatibility: Your WordPress theme may not support Aweber forms.
- JavaScript Errors: Check for errors in the console.
- Shortcode Issues: Ensure you use the correct shortcode for the form.
To fix form display problems, try these solutions:
- Switch to a default WordPress theme.
- Inspect the page for JavaScript errors using your browser’s developer tools.
- Verify that the Aweber shortcode is correct.
Testing different solutions helps identify the problem. Most issues can be fixed quickly.

Credit: www.wpbeginner.com
Maximizing Your Email Marketing Strategy
Connecting Aweber to WordPress boosts your email marketing efforts. This integration helps you grow your audience and increase engagement. Effective email marketing strategies can lead to higher conversions and customer loyalty.
Analyzing Aweber Reports And Analytics
Aweber provides detailed reports and analytics. Use these to understand your audience better. Key metrics to track include:
- Open Rates: This shows how many people opened your emails.
- Click-Through Rates: This indicates how many clicked links in your emails.
- Bounce Rates: This reflects the percentage of emails that didn’t reach the inbox.
- Unsubscribe Rates: This shows how many people opted out.
Review these metrics regularly. Identify trends and areas for improvement. Adjust your email content based on what works best.
Best Practices For Email Engagement
Engaging your audience is essential for success. Follow these best practices to improve engagement:
- Segment Your Audience: Group subscribers based on interests or behavior.
- Personalize Your Emails: Use the recipient’s name and tailor content.
- Craft Compelling Subject Lines: Make them catchy and relevant.
- Include Clear Calls-to-Action: Tell readers what to do next.
- Send Regular Newsletters: Stay in touch without overwhelming your audience.
Test different strategies. See what resonates with your audience. Keep refining your approach for optimal results.
Credit: www.wpbeginner.com
Frequently Asked Questions
How Do I Integrate Aweber With WordPress?
To integrate Aweber with WordPress, start by logging into your Aweber account. Then, navigate to the “Integrations” section. Select WordPress and follow the prompts to connect your account. You may need to install a plugin for seamless integration, which simplifies managing your email lists directly from WordPress.
Can I Use Aweber Forms On My WordPress Site?
Yes, you can use Aweber forms on your WordPress site. Simply create a sign-up form in Aweber and copy the provided HTML code. Then, paste it into a WordPress post, page, or widget. This allows visitors to subscribe directly to your mailing list without leaving your site.
Is There A Plugin For Aweber And WordPress?
Yes, there is an official Aweber plugin for WordPress. This plugin enables easy integration of Aweber forms into your site. It also helps manage your subscribers efficiently. You can find it in the WordPress plugin repository and install it directly from your dashboard.
How Do I Add Aweber To My WordPress Sidebar?
To add Aweber to your WordPress sidebar, create a form in Aweber. Copy the HTML code provided for the form. Next, go to your WordPress dashboard, navigate to Widgets, and add a Custom HTML widget to your sidebar. Paste the Aweber form code there and save your changes.
Conclusion
Connecting AWeber to WordPress enhances your email marketing efforts. With the right steps, you can streamline your subscriber management. This integration allows for better engagement and growth. Follow the outlined methods to ensure a smooth setup. Start leveraging the power of AWeber and watch your online presence flourish.