
Klaviyo is a powerful email and SMS marketing platform designed to help businesses engage with their customers effectively. Whether you’re an eCommerce store owner, a marketer, or a small business looking to automate your marketing efforts, setting up a Klaviyo account is the first step toward leveraging its robust features.
This guide will walk you through the process of creating a new Klaviyo account in professional mode, ensuring a smooth and user-friendly experience.
How to Create a New Klaviyo Account
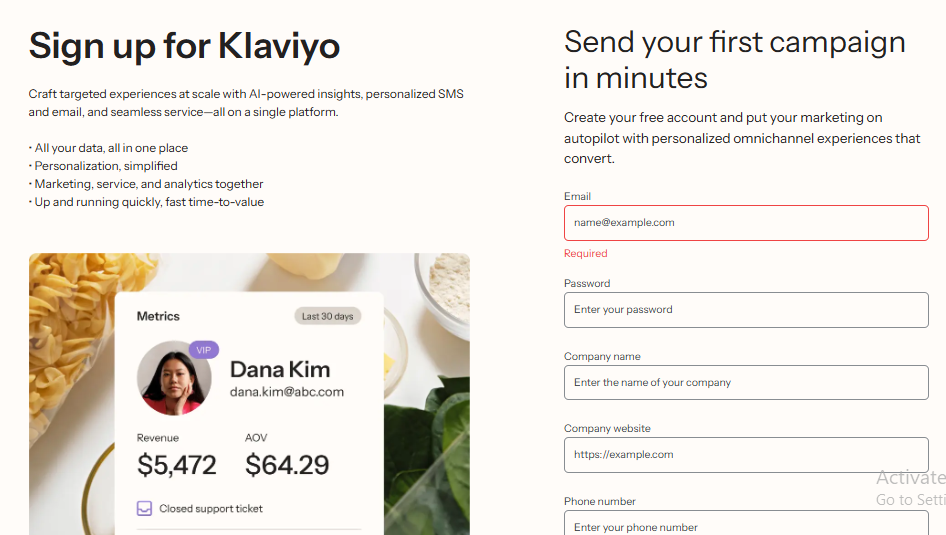
Step 1: Enter Your Business Email & Password
Lorem ipsum dolor sit amet, consectetur adipiscing elit. Ut elit tellus, luctus nec ullamcorper mattis, pulvinar dapibus leo.
You’ll be directed to the sign-up page, where you need to provide:
- Your business email address (avoid personal emails for professionalism)
- A strong password (use a mix of letters, numbers, and symbols)
Once filled, click “Create Account.”
Step 2: Verify Your Email Address
Klaviyo will send a verification email to the address you provided.
- Open your email inbox.
- Locate the email from Klaviyo (check spam/junk if not received).
- Click the “Verify Email” button or link inside the email.
This step ensures security and confirms account ownership.
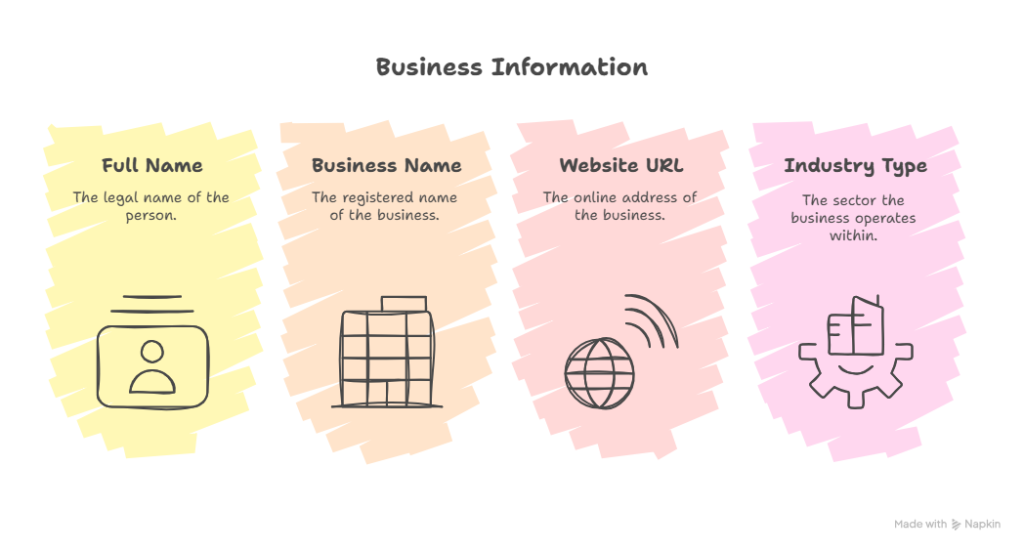
Step 3: Complete Your Business Profile
After verification, Klaviyo will prompt you to set up your business profile. Provide:
- Your full name
- Business name
- Website URL (if applicable)
- Industry type (e.g., eCommerce, retail, SaaS)
Filling this information helps Klaviyo customize your experience.
Step 4: Connect Your Store (Optional but Recommended)
Klaviyo integrates seamlessly with eCommerce platforms like Shopify, WooCommerce, and BigCommerce. If you have an online store:
- Click “Connect Store” on the dashboard.
- Select your eCommerce platform.
- Follow the prompts to authorize Klaviyo’s access.
This step enables automatic data syncing (orders, customers, products).
Step 5: Set Up Your First Audience (List or Segment)
Klaviyo organizes contacts into Lists (static groups) and Segments (dynamic groups based on behavior).
- Go to Audience > Lists & Segments.
- Click “Create List” or “Create Segment.”
- Name your audience (e.g., “Newsletter Subscribers”).
- Define criteria (if creating a segment).
This helps in targeted email campaigns.
Step 6: Import Contacts (If Available)
If you have existing customer data:
- Navigate to Audience > Import.
- Upload a CSV file or connect an integration (like Mailchimp).
- Map fields (email, name, etc.) for proper syncing.
Klaviyo will validate and import contacts.
Step 7: Explore Klaviyo’s Dashboard & Features
Familiarize yourself with Klaviyo’s interface:
- Campaigns: Create email/SMS marketing campaigns.
- Flows: Set up automated workflows (abandoned cart, welcome series).
- Analytics: Track performance metrics.
- Templates: Use pre-designed email templates.
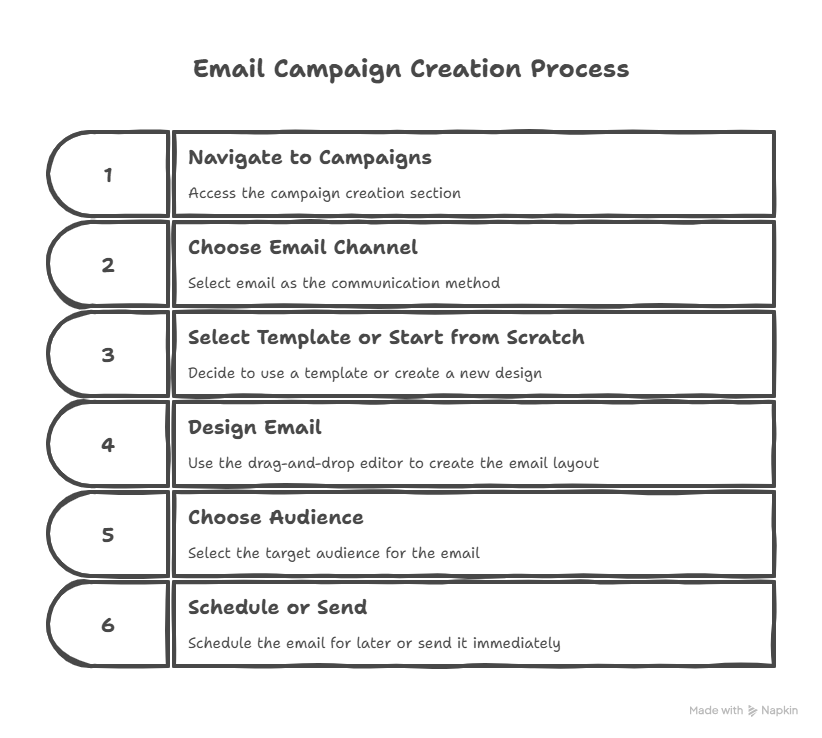
Step 8: Set Up Your First Email Campaign
To send your first email:
- Go to Campaigns > Create Campaign.
- Choose “Email” as the channel.
- Select a template or start from scratch.
- Design your email using the drag-and-drop editor.
- Choose your audience (list/segment).
- Schedule or send immediately.
Note: If someone signs up following this link, I will get an affiliate commission.
Step 9: Enable Two-Factor Authentication (Security Best Practice)
For added security:
- Click your profile icon (top-right).
- Go to Settings > Account > Security.
- Enable Two-Factor Authentication (2FA).
- Follow setup instructions (usually via SMS or an authenticator app).
Conclusion
Creating a Klaviyo account is straightforward, and following these steps ensures a professional setup. By integrating your store, importing contacts, and launching campaigns, you’ll maximize Klaviyo’s potential to boost engagement and sales.
Ready to get started? Sign up today and unlock powerful marketing automation